Creating Paid Webinars
Sell webinars via PayPal, Stripe payments, WooCommerce, Digistore24

Tobias
Last Update 3 jaar geleden
Can I sell webinars using WebinarIgnition?
Yes you can!
WebinarIgnition allows you to create paid webinars, which require users to pay before registering for the webinar.
Sure working for live and evergreen (instant and delayed) webinars
Following solutions are available:
- WooCommerce Shop (autofill data, secured workflow)
- Stripe
- PayPal
- Custom embed code
- Digistore24
First 3 redirect to a payment site and then user will be redirected to the secured webinar registration or directly to the webinar.
WooCommerce
User Journey:
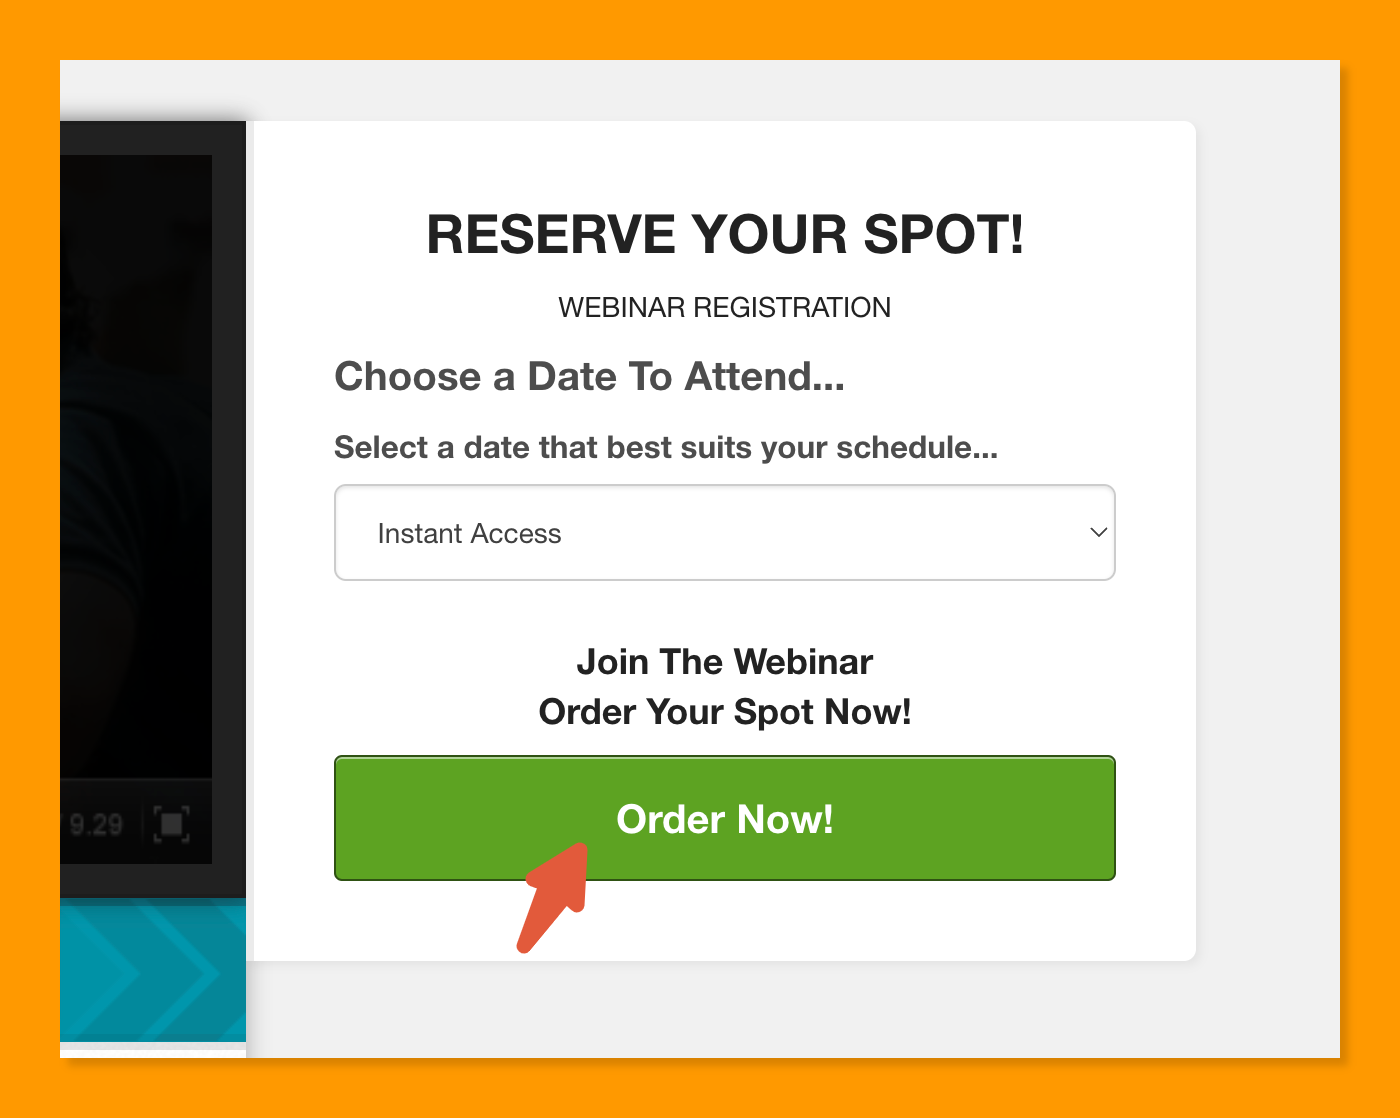
- User is on the registration page, click on "Order now!" button
- User is redirected to the WooCommerce shop checkout with the product in cart
- Be aware that a the moment we redirecting to webinar registration without looking at the payment gateways. We will maybe support non instant payments like bank transfer, manual invoice and do not redirect them when they completed the checkout.
- User pays for the product and is redirected to the webinar registration.
- Name and email address is filled out
- On live webinars user click register for the webinar
and is redirected to the confirmation page - On evergreen/automated/instant webinars
user select webinar instant or date & time in dropdown,
click register for the webinar and is redirected to the confirmation page.
What is possible?
Question: I know you can use this plug-in to charge for webinars. Is it possible to grant members the ability to view the webinar without paying?
For example, we have a group of members that are in a paid coaching program. We would like to give free webinars access to those coaching member, but charge others that are not in the program.
Answer: From the Paid Webinar settings get the "Thank You Page URL" and add it inside the secured coaching program. For the others share the default registration page. Where they pay before they can for the webinar.
Requirements:
- WebinarIgnition 2.9.1.x+ (26.4.2022+)
- Create a webinar set it to live (all text and content can be setup later)
- License for paid live webinars: Trial, paid ultimate
- License for paid evergreen webinars: free after opt-in e-mail-address, Trial, paid ultimate
- WooCommerce active
- A published webinar product (Product type simple & virtual ticked), 0$ for testing.
Checkbox ticket: Inventory > "Sold individually" - The URL of the webinar product
- The Product ID in address bar when you edit the product
- To reduce the checkout fields on digital product to minimal use this plugin
https://de.wordpress.org/plugins/woo-checkout-for-digital-goods/ - "Thanks Redirect for WooCommerce" active
https://wordpress.org/plugins/wc-thanks-redirect/
Setup:
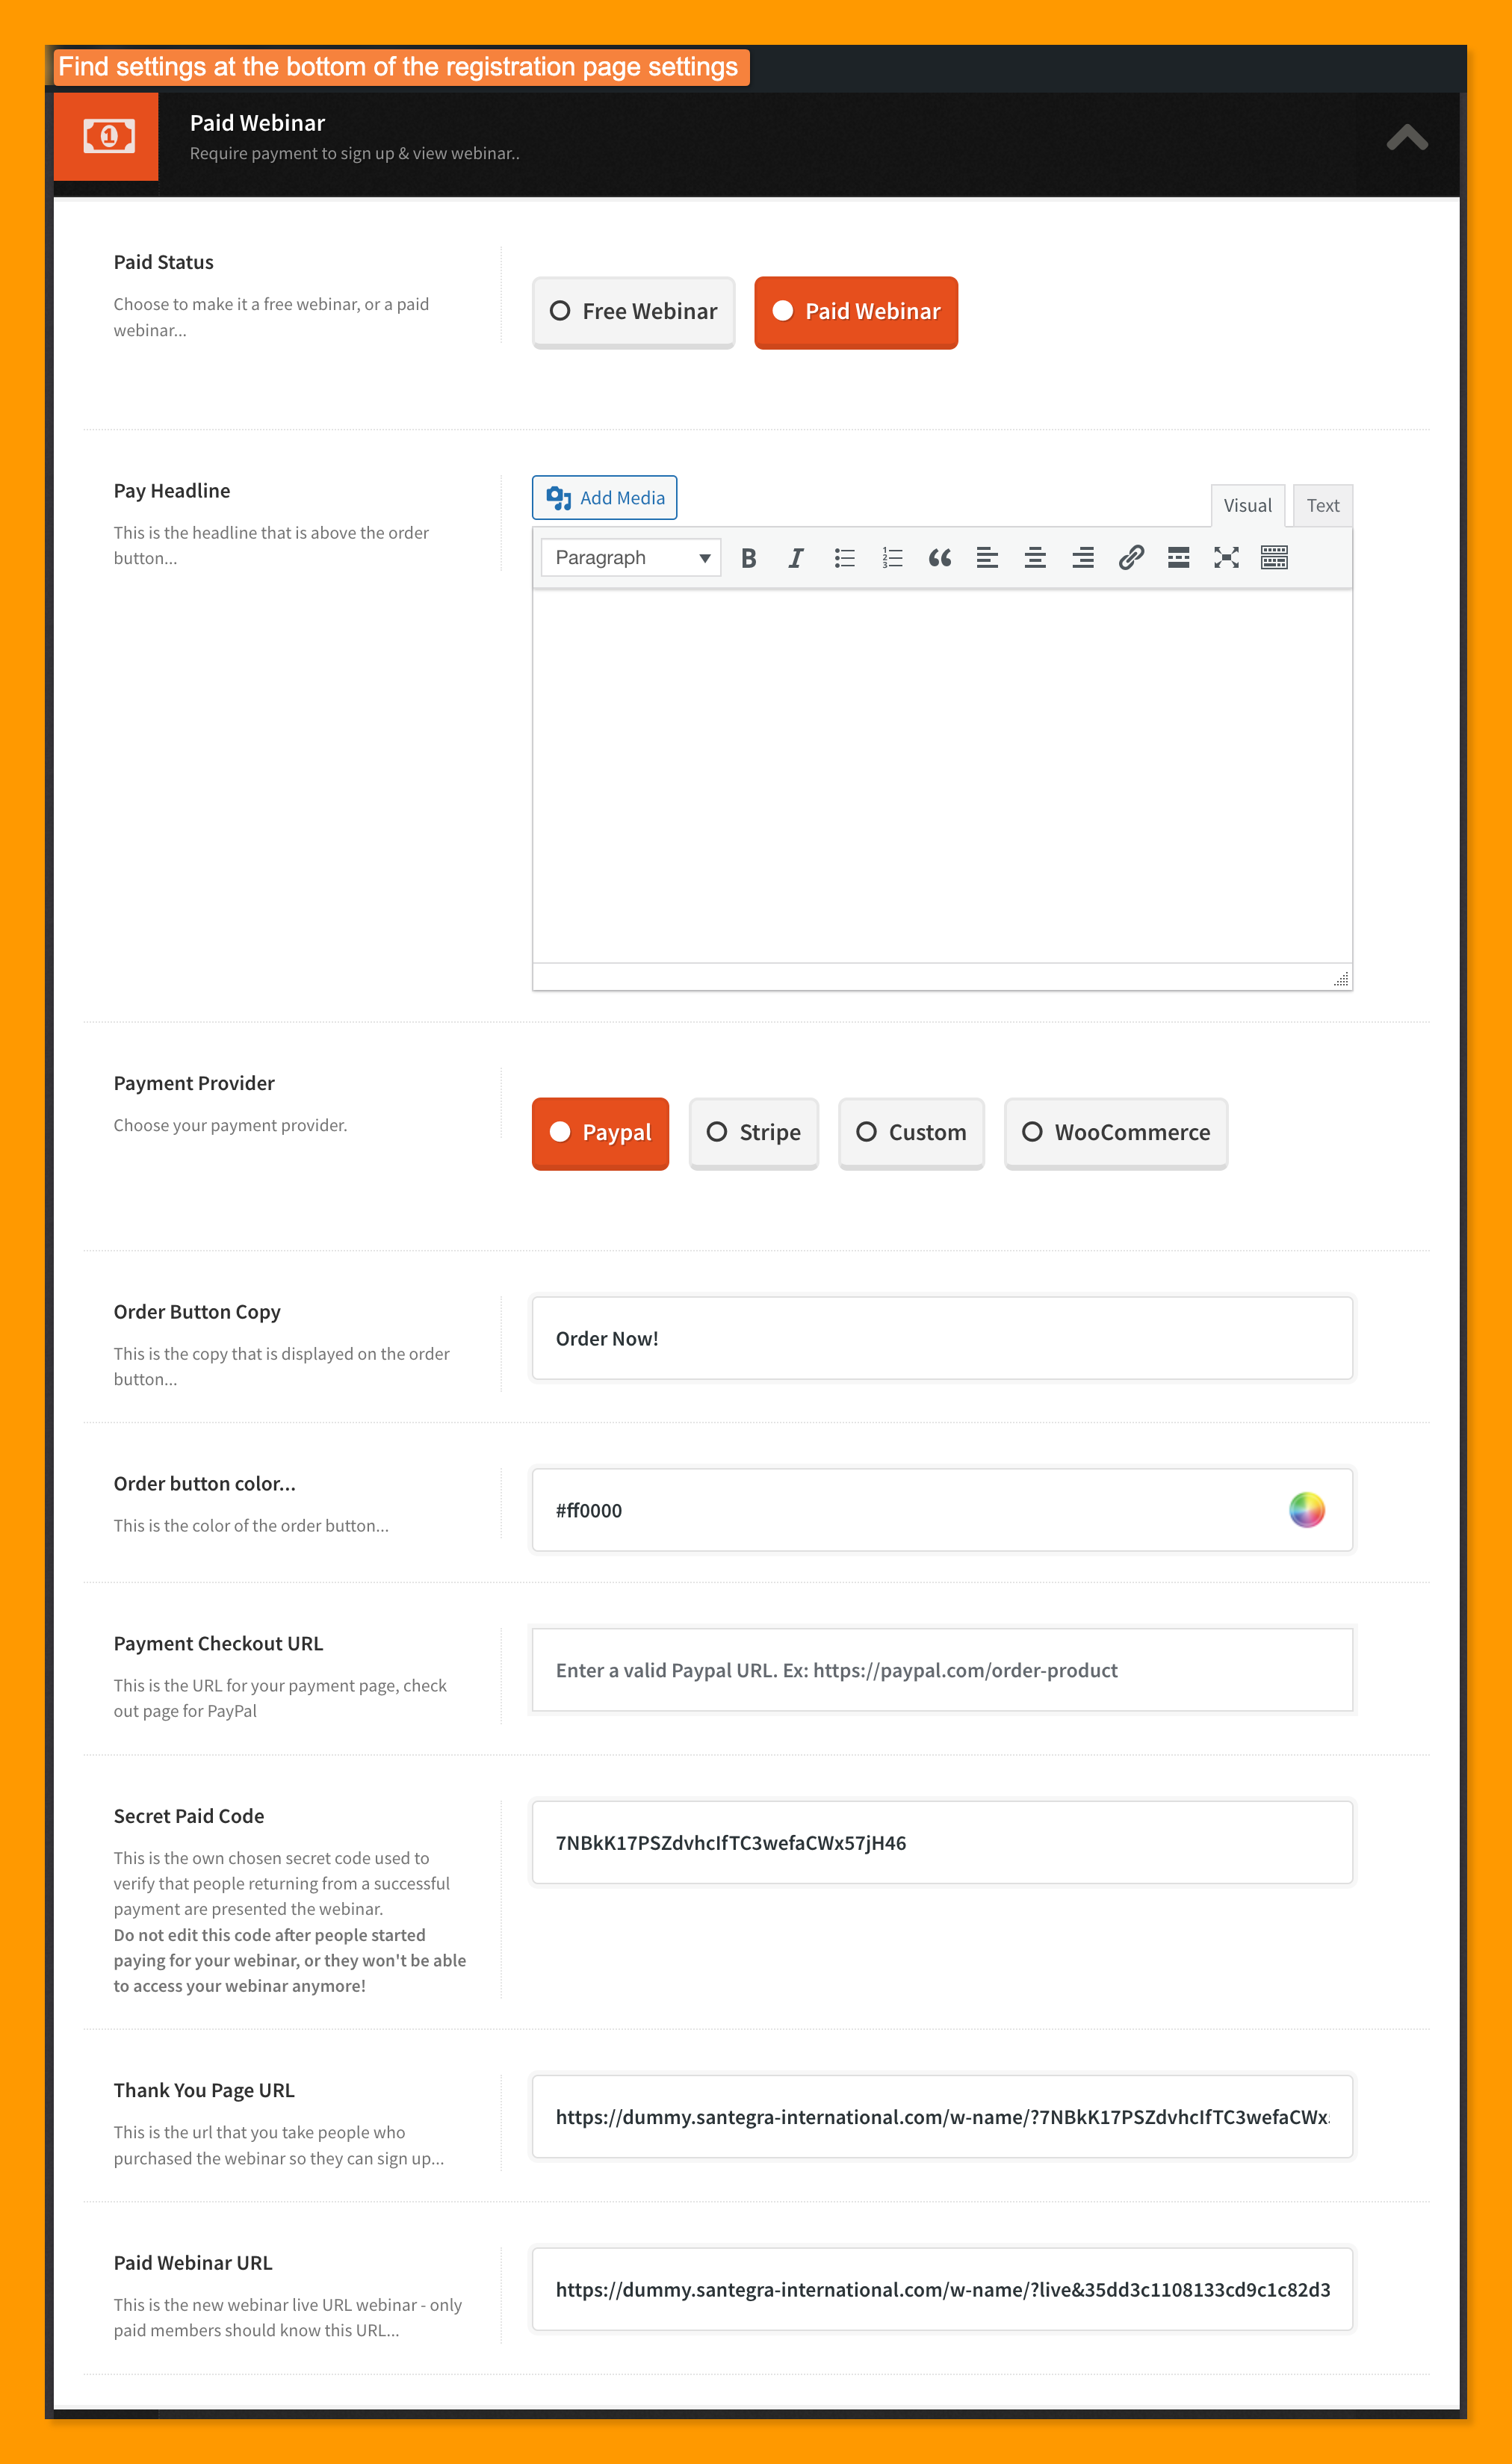
- In WebinarIgnition >> Go to registration tab >> "Paid Webinar" at the bottom
- Select the "Paid Webinar" Button
- Click the "WooCommerce" Button
- Add following link to the Payment Checkout URL https://domain.com/checkout/?add-to-cart=Product-ID
Replace Product-ID and Domain
(Hint: To avoid double adding the product, make sure you have a "/" before the "?" like /checkout/?add-to-cart=Product-ID) - Copy the "Thank You Page URL" from the Webinar settings
- Go to the WooCommerce webinar product pasted it inside the "Thank You URL" field below the price field.
To test:
- In WebinarIgnition >> Copy the normal registration URL and open it in a new incognito/privat browser window
- Make sure your test with a new email address each time, gmail helps you with that:
yourname+1@gmail.com, yourname+2@gmail.com, yourname+3@gmail.com - Go through the whole process and test on evergreen instant and one days in the future
After testing:
- Go to WooCommerce webinar product and set product price.
- Share the registration link and generate income
PS: This plugin solves the issue when you having not instant payment methods like bank transfer or pay per invoice active in you checkout.
With this plugin you can exclude all webinar products from being paid by this non instant payment solutions. So only paypal can be shown. ;-)
https://wordpress.org/plugins/payment-gateways-per-product-categories-for-woocommerce/
Stripe:
Stripe specific instructions
- Paste your secret key in the Stripe Secret Key field, which you can get from https://dashboard.stripe.com/account/apikeys
When testing your integration use the Test Secret Key. You can change to the Live Secret Key when you're done with testing. - Paste your publishable key in the Publishable Key field, which you can get from https://dashboard.stripe.com/account/apikeys
When testing your integration use the Test Publishable Key. You can change to the Live Publishable Key when you're done with testing. - Specify your charge for the webinar in the Charge field. This should be in cents. So, if you would like to charge US$120 for the webinar, then write 12000
- Specify the description for the charge. This is all that is needed. You need not edit the values in the fields below Button Color field.
- To test your integration you may use Stripe’s test credit card:
Number: 4242 4242 4242 4242
Expiry: 12 / 25
CVC: 123
PayPal:
The most important part of setting up Paypal for WebinarIgnition is to configure the auto-return url in Paypal.
This is the url to which your users will return to after making payment and is how WebinarIgnition will know that someone has paid for the webinar (and thus allow them to register).You can find the return url in the "Thank You Page URL" field in the "Paid Webinar" section of the the Registration Page settings page. It will be of the following form: https://example.com/webinar-title/?DotnapyDCa2CDpVN7R8vjjkJssMG6Hxp
https://developer.paypal.com/docs/admin/checkout-settings/#auto-return-the-buyer-to-your-website
You can now set up Paypal payment in any of the ways that Paypal provides; these are specified here: https://www.paypal.com/merchantapps/appcenter/acceptpayments/checkout
Let's use the easiest, as an example, which is the first one on that page, "Quick setup for individual items". In this case, you would have to create your Paypal button then paste it on one of your wordpress pages (this will be the Payment Checkout URL I mentioned above).
NB: when pasting, use an "custom html" block.When someone clicks on this button, they would then be able to pay with paypal and would be redirected to your webinar registration page (i.e., the auto-return url you specified before) and would be able toregister.
I know this can get a bit confusing at first, so please do not hesitate to let me know if you find any of this unclear or if you get stuck.
Amir
This older video will show you how to create PayPal paid webinars -- webinars for which attendees have to pay before attending.
5. Paid webinars with Digistore24